How To Make a Modal Popup Custom Module in HubSpot
If you’re familiar with Wistia, you’ve seen their cool modal window video embeds where the video plays in an overlay on top of the web page (also known as a lightbox popover). Modal windows are great for adding extra content on a page that would normally take up a large amount of space.
They also reduce it down to a simple link which can be virtually any size you want. The best ways to use these modals are video embeds, forms for bug reporting or getting feedback on a new layout, disclaimer/disclosures, and a whole lot more.
Now that you know what a modal window is and the best time to use them, I’m going to walk you through how to make one on HubSpot’s COS platform using their new custom modules feature in three simple steps.
The first thing you’re going to need to do is download a modal window plugin. There are a bunch of plugins out there that do similar things, but Magnific Popup is my personal favorite due to its simplicity and usability. Smashing Magazine has a great article about the process of making it and all of it’s various features.
Step 1: Download Magnific Popup
There are two core parts to Magnific Popup, the javascript (JS) file and the stylesheet (CSS) file. To keep things simple, I’ve already used their build tool to create the javascript file with the settings we’ll need and linked both files for you to download below:
Magnific Popup JS Magnific Popup CSS
Step 2: Create The Custom Module
Go into your design manager and click on “Create New Custom Module”. Call this module “Modal Popup”. If there are placeholder fields already in place, you will need to delete them on the left and delete all the code on the right. Once that’s done it should look like this:
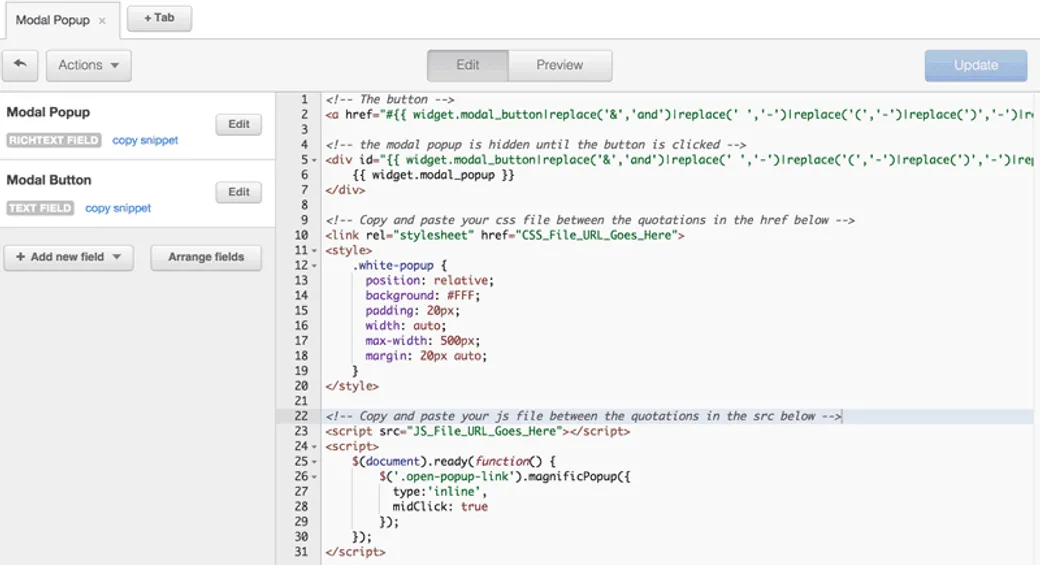
Now, you’ll need to create a rich text field called “Modal Popup” and a text field called “Modal Button”. Once that is done, copy the following snippet of code and paste it into the text area.
<!-- The button -->
<a href="#{{ widget.modal_button|replace('&','and')|replace(' ','-')|replace('(','-')|replace(')','-')|replace('?','')|replace('"','')|replace("'","")|replace(".","")|replace(":","")|replace(",","") }}" class="open-popup-link">{{ widget.modal_button }}</a>

<!-- the modal popup is hidden until the button is clicked -->
<div id="{{ widget.modal_button|replace('&','and')|replace(' ','-')|replace('(','-')|replace(')','-')|replace('?','')|replace('"','')|replace("'","")|replace(".","")|replace(":","")|replace(",","") }}" class="white-popup mfp-hide">
    {{ widget.modal_popup }}
</div>

<!-- Copy and paste your css file between the quotations in the href below -->
<link rel="stylesheet" href="CSS_File_URL_Goes_Here">
<style>
    .white-popup {
      position: relative;
      background: #FFF;
      padding: 20px;
      width: auto;
      max-width: 500px;
      margin: 20px auto;
    }
</style>

<!-- Copy and paste your js file between the quotations in the src below -->
<script src="JS_File_URL_Goes_Here"></script>
<script>
    $(document).ready(function() {
        $('.open-popup-link').magnificPopup({
          type:'inline',
          midClick: true
        });
    });
</script>
Now your custom module should look like this:
Last thing you’ll need to do is upload the two files you downloaded in step one into your portal’s file manager, copy each URL, and replace the placeholder text “CSS_File_URL_Goes_Here” with your Magnific-Popup.css URL and “JS_File_URL_Goes_Here” with your Magnific-Popup.js URL. Alternatively, if you’re going to use more than one on a single page, you should place the CSS in your site’s header and the JS scripts in your site’s footer.
Step 3: Try Out Your Awesome New Modal Window Module!
Edit any page that has a flex column, and add your shiny new custom module to the page, and give the modal button a name and Voila! — If it’s not working, be sure that your site has the latest version of jQuery by going to your content settings and changing the jQuery dropdown to version 1.11.x — If you found this tutorial helpful let us know in the comments below and we’ll write some more tutorials. You can view a live demo here.
Originally posted on Bluleadz.com